
How To: Conventional Deadlift
Do you want to improve your posture? Have developed glutes and hamstrings? Reduce or eliminate back pain? Maintain bone density? Have a stronger grip? Increase hip mobility? Burn calories? Build mountain-sized traps? Possess more overall strength? Be impressive from the back with bulging muscles when you take your shirt off?
If you answered in the affirmative to any of those desires, then allow me to introduce you to the conventional deadlift.
Often hailed along with squats as the king of all exercises, the deadlift is held in the esteem it is because it offers a multitude of health, fitness, and performance benefits.1NOTE: There are variations upon variations of deadlifts. The standard variation is the conventional deadlift and it’s generally what people mean when they refer to the deadlift when the term is used by itself without a preceding descriptor, such as Romanian deadlifts, stiff-legged deadlifts, and sumo deadlifts, for example. It’s like how there are many variations of squats but the barbell back squat is typically what’s meant when someone says “squats”. In other words, “conventional deadlifts” and “deadlifts” are often used interchangeably, which will be the case throughout the text. It’s for this reason that conventional deadlifts are an exercise everyone should do, whether you’re an athlete, bodybuilder, or recreational lifter.
Be that as it is that the conventional deadlift has so many benefits, you may want to start deadlifting. However, before you do, you should know that the deadlift is one of the most butchered exercises on the planet. As easy as the exercise looks, it’s a bit more complex than just picking up a weight from the ground and putting it back down. There are in fact a lot of moving parts to the deadlift and it’s important to perform it properly to not only get the full benefit of it but to also limit the risk of injury.
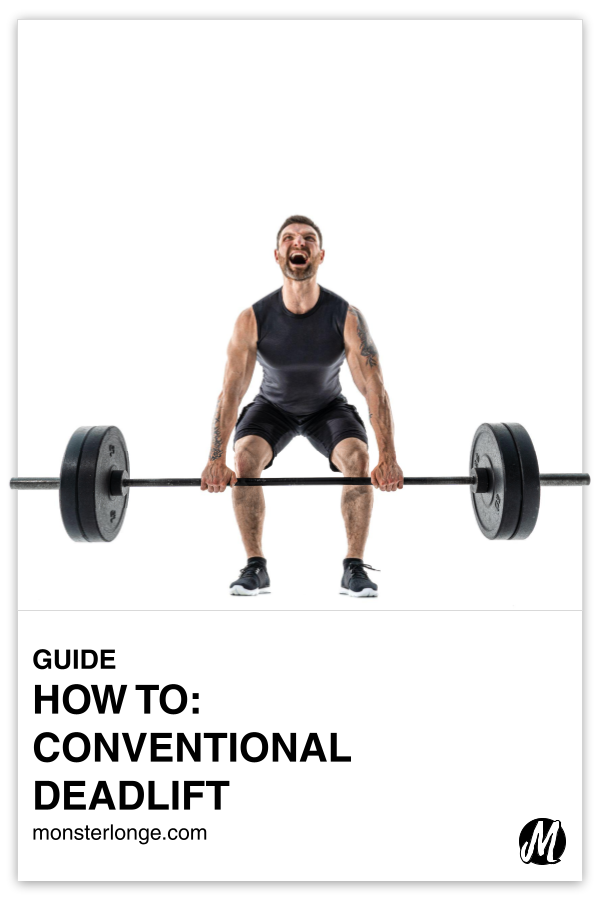
INSTRUCTIONS
1). Stand in front of a barbell with your legs shoulder-width apart and your feet halfway underneath.
2). Hinge at the waist and sink your hips to lower yourself and grab the barbell with a pronated, or overhand, grip.2Here, your shoulders should be directly over your hips and the barbell should be close to your shins.3NOTE: To lift more weight, a mixed grip may also be used. That involves gripping the bar overhand with one arm and the other gripping it underhanded. If using such a grip, be sure to switch the grip of each hand every set to avoid the risk of developing a muscle imbalance and eventually tearing the biceps.
3). Hold the bar tightly and squeeze your lats.4A popular cue to squeeze the lats is to imagine that you have oranges in your armpits that you’re trying to make delicious armpit orange juice out of.
4). Breathe in and brace your core as you push your feet through the floor and stand up. As the bar rises above your knees, squeeze your glutes and thrust your hips forward.
5). Stand up until you’re fully erect then breathe out.
6). After lockout (i.e. when you’re fully vertical), hinge at the waist and shoot the hips back as you lower the weight, with you bending your knees when the barbell reaches there.
7). Rest the barbell on the ground and reset before the next rep.
NOTE (1): A cue to keep your chest up and prevent your back from rounding is to show off your logo. In other words, imagine that someone was standing in front of you and you want them to be able to read whatever’s on your shirt throughout the entire rep. That cue, as well as being sure to take a deep breath before pulling, should help stabilize the spine and minimize any potential rounding issues with the back. That said, a little rounding of the back is acceptable and it’ll happen naturally with heavy weights. The problem is when it’s excessive and occurs with relatively light weight.
NOTE (2): Don’t think of trying to pull the bar off the ground. Focusing on pulling the bar can cause the hips to rise too fast and the head to move, all of which can exacerbate the risk of back injury. Instead, as mentioned, just think of standing up with the bar. A cue for this is to lead with the head by thinking of exploding your head upward while standing.
NOTE (3): At the top, don’t hyperextend. Instead, stand tall and resist the urge to lean back.
NOTE (4): When first learning how to deadlift, your core shouldn’t be the limiting factor in how much weight you can pull. That honor will go to your technique. It won’t be until after your form becomes more proficient after numerous exposures to the exercise that your core strength will start limiting the amount of weight you can deadlift. Only at that point should you entertain the idea of wearing a weightlifting belt, and then it should only be worn when attempting a load that’s at or near your one-rep max.
NOTE (5): Consult a physical therapist or other professional on whether or not you should deadlift if you have a preexisting spine or disc injury or history of chronic back pain.
![]()
For a workout routine that possibly includes the conventional deadlift, as well as other exercises geared specifically to your goals, training experience, injury history, and available equipment, then find out more HERE
Glossary: barbell, biceps, bodybuilder, calories, chest, deadlift, exercise, exercise equipment, fitness, glutes, goal, lats, lifting belt, lifting form, muscle, one-rep max, reps, routine, squats, training, traps
- Just The Tip #4441 - May 5, 2026
- Just The Tip #400 - May 4, 2026
- Just The Tip #3017 - April 30, 2026
